Showing posts with label Memo App. Show all posts

Monday, March 19, 2012

My memo app supports multilingualization in new version 1.7


http://windowsphone.com/s?appid=01fada6f-ff7e-451b-b0b0-3bf3a5c0f655

I'm really happy to announce my memo app's new release version 1.7 !
In new version, my memo app supports multilingualization that are English and Japanese.

And second feature is that you can choose character color (black or white). You can customize character color and background color as you want.

So, please check the function in bellow Yourtube video.


Please download my memo app in your Windows Phone ! 
Thanks.

Monday, January 16, 2012

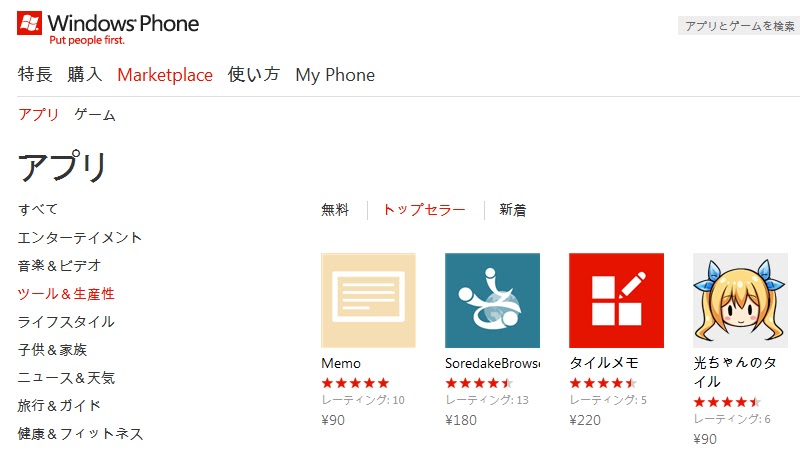
My memo app became No.1 in Japan region ranking !


http://www.windowsphone.com/ja-JP/categories/toolsandproductivity?list=top&wa=wsignin1.0


My memo app became No.1 in "tools + productivity" in Japan region ranking !
I really want to say thanks so much and please download trial version if you don't use it yet.
The memo app is simple and you can note a short memo. (ex, buying list)

  • new feature in ver.1.3


You can clip memo to tile from ver1.3. This is most fantastic feature in previous updates.
Please see the movie and check the feature.


  • If you can't download memo app,
Please visit this page on Windows Phone, and click "download trial version".

Or you can search memo app, "memos", "note", "notes", like this.

Thursday, December 29, 2011

How to Generate Tile Image from StackPanel

You can make your original live tiles from your application by using StandardTileData.
But, the tile layout is limited. So, you cannot add free format text or object into live tile. The layout format is here


 If you want to add customized layout tile, you need to generate Bitmap Image using BitmapImage and WriteableBitmap and save the image into IsoratedStorage.
Please see the movie. This is from my Memo app. The movie shows that I generate a live tile from StackPanel by clicking Check Button after I change some font styles.


  • Code Sample
I introduce code sample from my Memo app. The code generates a live tile from StackPanel. Please see bellow movie.


- xaml code

The xaml code is very simple. You can change the TextBlock on the StackPanel from code.

 <StackPanel Height="173" x:Name="TilePanel" Width="173" Background="Wheat" >  
   <TextBlock x:Name="tileText" Style="{StaticResource PhoneTextNormalStyle}" HorizontalAlignment="Left" FontSize="20" TextWrapping="Wrap" />  
 </StackPanel>  


- C# code

The steps are here.

1. Create BitmapImage url.
2. Create a bitmapImage to IsolatedStorage.
3. Create a live tile using the created bitmapImage.

public static void GenerateTile(StackPanel background, string colorTitle, TextBlock tileText, string id)
{
    //Create BitmapImage url.
    //BitmapImage url should be "/Shared/ShellContent/" to share images.
    var source = new BitmapImage(new Uri("/Shared/ShellContent/", UriKind.Absolute));
    var tileImage = "/Shared/ShellContent/" + colorTitle + id + ".jpg";
    var isoStoreTileImage = string.Format("isostore:{0}", tileImage);

    //Create a bitmapImage to IsolatedStorage.
    using (IsolatedStorageFile store = IsolatedStorageFile.GetUserStoreForApplication())
    {
        //Tile image's Height * Width are 173 * 173.
        var bitmap = new WriteableBitmap(173, 173);

        //Render a bitmap from StackPanel.
        bitmap.Render(background, new TranslateTransform());
        var stream = store.CreateFile(tileImage);
        bitmap.Invalidate();
        bitmap.SaveJpeg(stream, 173, 173, 0, 100);
        stream.Close();
    }

    //Create a live tile using the created bitmapImage.
    StandardTileData secondaryTile = new StandardTileData
    {
        BackgroundImage = new Uri(isoStoreTileImage, UriKind.Absolute),
        Title = "",
        Count = null,
    };
    //Live tile has own url.
    //You can go to your application page when you click a live tile.
    ShellTile.Create(new Uri("/Memo.xaml?id=" + id, UriKind.Relative), secondaryTile);
}


  • Reference
I questioned the topic in StackOverflow. The page is here.
A expert, his name is Claus Jørgensen, gave me excellent solution to resolve the issue. His solution is here.
He also has his code in Guthub.

Sunday, December 25, 2011

Introduction of using Windows Phone Toolkit vol.5 : List Picker


Introduction of using Windows Phone Toolkit vol.1 : Download and prepare to use toolkit
Introduction of using Windows Phone Toolkit vol.2 : Tilt effect
Introduction of using Windows Phone Toolkit vol.3 : Transitions
Introduction of using Windows Phone Toolkit vol.4 : ContextMenu
Introduction of using Windows Phone Toolkit vol.5 : List Picker


Today, I introduce listpicker in Windows Phone Toolkit. I think this is most popular function in WP toolkit.
Listpicker has a lot of types of list, checkbox, listbox , combobox, etc. Let's see bellow movie and check functions.


  • Samples

Basic samples are here.

- Just choose from a list (first list on the movie)
 <toolkit:ListPicker Header="Background">  
   <sys:String>dark</sys:String>  
   <sys:String>light</sys:String>  
   <sys:String>dazzle</sys:String>  
 </toolkit:ListPicker>  


- Choose from a list of another page (second list on the movie)
<toolkit:ListPicker Header="Background" ExpansionMode="FullscreenOnly">  
   <sys:String>dark</sys:String>  
   <sys:String>light</sys:String>  
   <sys:String>dazzle</sys:String>  
   <toolkit:ListPicker.FullModeItemTemplate>  
     <DataTemplate>  
       <StackPanel Orientation="Horizontal" Margin="16 21 0 20">  
         <TextBlock Text="{Binding}"  
             Margin="0 0 0 0"  
             FontSize="43"   
             FontFamily="{StaticResource PhoneFontFamilyLight}"/>  
       </StackPanel>  
     </DataTemplate>  
   </toolkit:ListPicker.FullModeItemTemplate>  
 </toolkit:ListPicker>  

  • Sample from my memo app

I also use listpicker in my memo app.
This is color choice list. Please see bellow the movie first.


We can see same color choice list in WP toolkit sample. But the sample is little bit difficult because the sample uses DataContext and IValueConverter interface. I'll show you the simplest sample to use color choice list.


- xaml code
 <toolkit:ListPicker ItemsSource="{Binding}" Name="colorList" FullModeHeader="ACCENTS" CacheMode="BitmapCache" Width="350" SelectionChanged="ListPicker_SelectionChanged">  
   <toolkit:ListPicker.ItemTemplate>  
     <DataTemplate>  
       <StackPanel Orientation="Horizontal">  
         <Rectangle Fill="{Binding BackgroundColor}" Width="24" Height="24"/>  
         <TextBlock Text="{Binding ColorTitle}" Margin="12 0 0 0"/>  
       </StackPanel>  
     </DataTemplate>  
   </toolkit:ListPicker.ItemTemplate>  
   <toolkit:ListPicker.FullModeItemTemplate>  
     <DataTemplate>  
       <StackPanel Orientation="Horizontal" Margin="0 21 0 20">  
         <Rectangle Fill="{Binding BackgroundColor}" Width="50" Height="50"/>  
         <TextBlock Text="{Binding ColorTitle}"  
             Margin="16 0 0 0"  
             FontSize="35"/>  
       </StackPanel>  
     </DataTemplate>  
   </toolkit:ListPicker.FullModeItemTemplate>  
 </toolkit:ListPicker>  

"<toolkit:ListPicker.ItemTemplate>" indicates display format of chosen color from color list.
"<toolkit:ListPicker.FullModeItemTemplate>" indicates display format of color choice list.
Both tags have bindings of Rectangle and TextBlock which used in code behind.


- code behind
 public Tile()  
 {  
   InitializeComponent();  
   //set color list  
   List<ColorsList> list = new List<ColorsList>();  
   foreach (var c in ColorSet.ReturnColor())  
   {  
     list.Add(new ColorsList { BackgroundColor = new SolidColorBrush(Color.FromArgb(c.a, c.r, c.g, c.b)), ColorTitle = c.ColorTitle });  
   }  
   colorList.ItemsSource = list;  
}
 public class ColorsList  
 {  
   public Brush BackgroundColor { get; set; }  
   public string ColorTitle { get; set; }  
 }  

"ColorSet.ReturnColor()" returns colors set from color source of List<>.

Friday, December 16, 2011

My Memo app's new version 1.2 was released !


I'm really happy to announce new version 1.2 of my Memo application !
Please download and use it !


The memo app is very fast. There is One Note in Windows Phone by default. But One Note is slow and not easy to use sometime. So, If you want to take short memo, you must use my Memo app.


  • New Features
I introduce new features of my Memo app. 

  • Colors
You can change background color in my Memo app. 
In previous version, The background color is only wheat. But you are able to choose Japanese originated colors depend on your feeling. These colors are very beautiful.

Also the tile of memo app change when you choose a color.


  • WP specific UI action
I changed user interface to Windows Phone like action. 
Please check these actions.


- Paging like shuffling through a book. 


- Click action. (tilt effect)


- Context menu when you click for a while.


You can check how to implement in your app in these blog posts.


Introduction of using Windows Phone Toolkit vol.2 : Tilt effect
Introduction of using Windows Phone Toolkit vol.3 : Transitions
Introduction of using Windows Phone Toolkit vol.4 : ContextMenu


  • Bug fixes
I fixed these bugs.

- Chinese character is showed when you use Japanese locale setting.
- Add button (+) doesn't work on Memo page.
- ApplicationBar menu on Main page has trouble seeing.


Please download and use it !

Thanks.


Wednesday, December 14, 2011

Introduction of using Windows Phone Toolkit vol.4 : ContextMenu


Introduction of using Windows Phone Toolkit vol.1 : Download and prepare to use toolkit
Introduction of using Windows Phone Toolkit vol.2 : Tilt effect
Introduction of using Windows Phone Toolkit vol.3 : Transitions
Introduction of using Windows Phone Toolkit vol.4 : ContextMenu
Introduction of using Windows Phone Toolkit vol.5 : List Picker


Today, I'd like to introduce ContextMenu. For instance, in buildin Outlook app in Windows Phone, you can find ContextMenu when you click down for a while. Please check it bellow movie.


  • How coding
First, you need to write content menu code in some control in xaml code. You can add content menu not only Button control also other controls. I introduce about Button in this part.

<Button Margin="0,0"   
     VerticalAlignment="Center"  
     Padding="12"  
     Content="ContextMenu"  
     FontSize="18">  
   <toolkit:ContextMenuService.ContextMenu>  
     <toolkit:ContextMenu>  
       <!-- You can suppress tilt on indivudal menu items with TiltEffect.SuppressTilt="True" -->  
       <toolkit:MenuItem Header="this is a menu item" Click="MenuItem_Click"/>  
       <toolkit:MenuItem Header="this is another menu item" Click="MenuItem_Click"/>  
       <toolkit:MenuItem Header="this is a yet another menu item" Click="MenuItem_Click"/>  
     </toolkit:ContextMenu>  
   </toolkit:ContextMenuService.ContextMenu>  
 </Button>  


Second, write click event code in code behind. In bellow code, adding a text which is selected in context menu to TextBlock(lastSelection).

private void MenuItem_Click(object sender, RoutedEventArgs e)
{
    lastSelection.Text = (string)((MenuItem)sender).Header;
}

Also you can use Command to bind action and use MVVM patern. I'll show you next blog post.


  • Use context menu in Listbox
I think almost of people use context menu in Listbox. I introduce how to use context menu in Listbox through my memo app. Please see bellow movie. The movie indicates you can delete selected item using context menu.


The xaml code is bellow.

 <ListBox x:Name="listBox1" ItemsSource="{Binding}" Margin="0,-20,0,0" SelectionChanged="listBox1_SelectionChanged">  
   <ListBox.ItemTemplate>  
     <DataTemplate>  
       <StackPanel HorizontalAlignment="Stretch" Orientation="Horizontal">  
         <TextBlock FontSize="35" x:Name="Title" Text="{Binding Title}" />  
         <TextBlock FontSize="25" x:Name="Date" Text="{Binding Date}" />  
         <TextBlock x:Name="Id" Text="{Binding Id}" Visibility="Collapsed" />  
         <toolkit:ContextMenuService.ContextMenu>  
           <toolkit:ContextMenu BorderThickness="0" BorderBrush="White">  
             <toolkit:MenuItem Header="delete" Click="Delete_Click"/>  
           </toolkit:ContextMenu>  
         </toolkit:ContextMenuService.ContextMenu>  
       </StackPanel>  
     </DataTemplate>  
   </ListBox.ItemTemplate>  
 </ListBox>  


The code behind is also here.

private void Delete_Click(object sender, RoutedEventArgs e)
{
    MessageBoxResult result = MessageBox.Show("do you want to delete the memo?", "Delete memo?", MessageBoxButton.OKCancel);
    if (result == MessageBoxResult.OK)
    {
        string header = (sender as MenuItem).Header.ToString();
        ListBoxItem selectedListBoxItem = this.listBox1.ItemContainerGenerator.ContainerFromItem((sender as MenuItem).DataContext) as ListBoxItem;
        if (selectedListBoxItem != null && header == "delete")
        {
            ItemsList list = (ItemsList)selectedListBoxItem.Content;
            items = new ItemInfo();
            items.DeleteItemFromStorage(list.Id); // delete memo from database

            NavigationService.Navigate(new Uri("/MainPage.xaml", UriKind.Relative));
        }

    }
}

//binding to textblok in Listbox
public class ItemsList
{
    public string Id { get; set; }
    public string Title { get; set; }
    public string Date { get; set; }
}


Introduction of using Windows Phone Toolkit vol.3 : Transitions


Introduction of using Windows Phone Toolkit vol.1 : Download and prepare to use toolkit
Introduction of using Windows Phone Toolkit vol.2 : Tilt effect
Introduction of using Windows Phone Toolkit vol.3 : Transitions
Introduction of using Windows Phone Toolkit vol.4 : ContextMenu
Introduction of using Windows Phone Toolkit vol.5 : List Picker


This time, I introduce Transitions. Transitions is paging from a xaml page to another xaml page like shuffling through a book. Please check bellow movie.


  • How coding
The function is also easier than other functions. You need to do things are only two steps.
First, add bellow code after phone:PhoneApplicationPage tag in your xaml page which you want to add the function. 

 
 <toolkit:TransitionService.NavigationInTransition>  
   <toolkit:NavigationInTransition>  
     <toolkit:NavigationInTransition.Backward>  
       <toolkit:TurnstileTransition Mode="BackwardIn"/>  
     </toolkit:NavigationInTransition.Backward>  
     <toolkit:NavigationInTransition.Forward>  
       <toolkit:TurnstileTransition Mode="ForwardIn"/>  
     </toolkit:NavigationInTransition.Forward>  
   </toolkit:NavigationInTransition>  
 </toolkit:TransitionService.NavigationInTransition>  
 <toolkit:TransitionService.NavigationOutTransition>  
   <toolkit:NavigationOutTransition>  
     <toolkit:NavigationOutTransition.Backward>  
       <toolkit:TurnstileTransition Mode="BackwardOut"/>  
     </toolkit:NavigationOutTransition.Backward>  
     <toolkit:NavigationOutTransition.Forward>  
       <toolkit:TurnstileTransition Mode="ForwardOut"/>  
     </toolkit:NavigationOutTransition.Forward>  
   </toolkit:NavigationOutTransition>  
 </toolkit:TransitionService.NavigationOutTransition>  


Second, change bellow code to use transitions.

RootFrame = new TransitionFrame();

  • Before
private void InitializePhoneApplication()
{
    if (phoneApplicationInitialized)
        return;

    // Create the frame but don't set it as RootVisual yet; this allows the splash
    // screen to remain active until the application is ready to render.
    RootFrame = new PhoneApplicationFrame();
    RootFrame.Navigated += CompleteInitializePhoneApplication;

    // Handle navigation failures
    RootFrame.NavigationFailed += RootFrame_NavigationFailed;

    // Ensure we don't initialize again
    phoneApplicationInitialized = true;
}

  • After
private void InitializePhoneApplication()
{
    if (phoneApplicationInitialized)
        return;

    // Create the frame but don't set it as RootVisual yet; this allows the splash
    // screen to remain active until the application is ready to render.
    RootFrame = new TransitionFrame(); /// Change the code. ///
    RootFrame.Navigated += CompleteInitializePhoneApplication;

    // Handle navigation failures
    RootFrame.NavigationFailed += RootFrame_NavigationFailed;

    // Ensure we don't initialize again
    phoneApplicationInitialized = true;
}


Also the bellow movie is my memo app using Transition.


That's all. The function is very cool. There are also other paging functions. Please check it.

Monday, December 12, 2011

Introduction of using Windows Phone Toolkit vol.2 : Tilt effect


Introduction of using Windows Phone Toolkit vol.1 : Download and prepare to use toolkit
Introduction of using Windows Phone Toolkit vol.2 : Tilt effect
Introduction of using Windows Phone Toolkit vol.3 : Transitions
Introduction of using Windows Phone Toolkit vol.4 : ContextMenu
Introduction of using Windows Phone Toolkit vol.5 : List Picker


In this blog post, I show you tilt effect that is a motion of a object sinking down when you click it.
You can check the motion in bellow movie.


  • How coding
The function is the easiest to build in your app. You just add bellow tag into all of your xaml pages.

toolkit:TiltEffect.IsTiltEnabled="True"

 <phone:PhoneApplicationPage   
   x:Class="Memo.MainPage"  
   xmlns="http://schemas.microsoft.com/winfx/2006/xaml/presentation"  
   xmlns:x="http://schemas.microsoft.com/winfx/2006/xaml"  
   xmlns:phone="clr-namespace:Microsoft.Phone.Controls;assembly=Microsoft.Phone"  
   xmlns:shell="clr-namespace:Microsoft.Phone.Shell;assembly=Microsoft.Phone"  
   xmlns:d="http://schemas.microsoft.com/expression/blend/2008"  
   xmlns:mc="http://schemas.openxmlformats.org/markup-compatibility/2006"  
   xmlns:toolkit="clr-namespace:Microsoft.Phone.Controls;assembly=Microsoft.Phone.Controls.Toolkit"  
   mc:Ignorable="d" d:DesignWidth="480" d:DesignHeight="768"  
   FontFamily="{StaticResource PhoneFontFamilyNormal}"  
   FontSize="{StaticResource PhoneFontSizeNormal}"  
   Foreground="{StaticResource PhoneForegroundBrush}"  
   SupportedOrientations="Portrait" Orientation="Portrait"  
   shell:SystemTray.IsVisible="True"  
   toolkit:TiltEffect.IsTiltEnabled="True">  

Also the bellow movie is my memo app using tilt effect in listbox.


Sunday, December 11, 2011

Cannot select trial version checkbox in Market Place

When you upload your app into Market Place, sometime you cannot select trial version checkbox because the checkbox is grayout.

The most important thing is that you need to use IsTrail() method in your app if you provide trial version.


  • Try to use IsTrail() method

IsTrail() method's document is here.


Also see here.


Sample code is here.

using Microsoft.Phone.Marketplace;

        
public static bool TrialVersion;
LicenseInformation licenseInfo = new LicenseInformation();

TrialVersion = licenseInfo.IsTrial();

if (!TrialVersion)
{
    button1.Visibility = Visibility.Collapsed;
}
else
{
    button1.Visibility = Visibility.Visible;
}


When you use IsTrail() method, the method communicate with Market Place and check your status. So, you had better use IsTrail() method only once in your app.

Memo app for Windows Phone released


I am really excited to announce my Memo app for Windows Phone today.
http://www.windowsphone.com/ja-JP/apps/01fada6f-ff7e-451b-b0b0-3bf3a5c0f655

Please search and find my memo app in Market place, keywords are "memo", "note" like that.
You can take a short memo like iPhone memo app.

The most important thing I'd like to add is you can use trial version the most of same as functionality of full version and no limit.


  • Main page
There are notes you take. The first row of your memo is to be title. You can add new memo by + button.


  • Memo page
You can take memo on this page. Keyboard goes down when you click "Save" button.


  • About Updates
I'm going to add new features to memo app constantly.
And, Please don't forget rating and review. 


Thanks,